
If you’ve ever turned on your tap only to find a trickle of water or none at all, your well pump might need priming. This simple yet vital maintenance task restores proper water flow by removing air that’s blocking the system. You don’t need to be a plumbing expert to handle this job—with the right tools and a bit of patience, you’ll have your water running smoothly again. Let’s walk through the process to get your household water supply back on track.
Steps to Prime a Water Pump
To prime your well pump effectively, you’ll need to follow several key steps in sequence. Start by preparing the pump system and disconnecting the power supply, then carefully fill the pump housing with water until no air bubbles remain. Understanding whether you have a submersible or jet pump will help determine the specific priming requirements. Once you’ve sealed the prime plug tightly, test the water flow at your nearest tap to confirm successful priming.
Prepare Pump System
Before diving into the priming process, you’ll need to properly prepare your well pump system. Start by ensuring the pump is completely switched off and disconnected from power for safety. Next, locate the prime plug at the top of your pump housing—this is where you’ll add water during priming.
Release any pressure in the system by opening relief valves on your pressure tank. It’s also helpful to have a bucket of clean water ready for the actual priming. These preparatory steps might seem tedious, but they’re indispensable for a successful priming process and will save you hassle later.
Disconnect Mains Supply
Safety must be your top priority when working with any electrical equipment, especially around water. To properly disconnect your well pump’s power source, locate your home’s consumer unit and switch off the dedicated circuit breaker for the pump system. If you’re not sure which circuit breaker controls the pump, turn off the main power supply instead.
Don’t rush this step—water and electricity make dangerous partners. After you’ve flipped the circuit breaker, verify the power is truly off by checking if the pump responds to controls. For extra caution, you might want to place a piece of tape over the circuit breaker switch with a note saying “Do Not Turn On.” This prevents anyone from accidentally restoring power while you’re working on the system. Remember, a few seconds spent on proper disconnection can prevent serious injury.
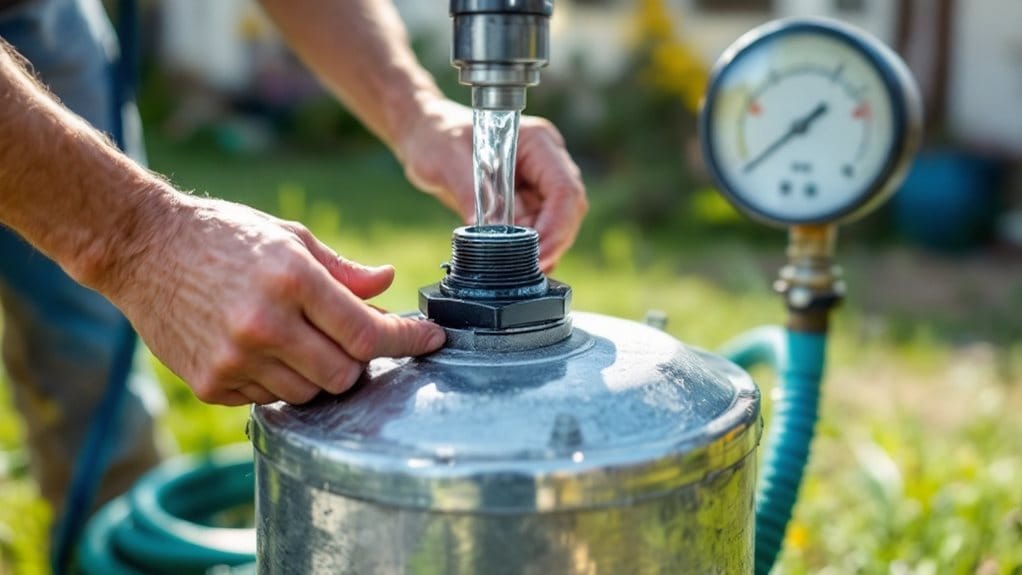
Fill Pump Housing
Once you’ve safely disconnected the power, it’s time for the heart of the priming process: filling the pump housing with water. Locate the prime plug on top of the pump casing and remove it carefully. You’ll need about 1-2 litres of clean water, depending on your pump size.
Pour water slowly into the opening until you see it filling the pump casing completely. The trick is to continue adding water until it flows out without any air bubbles. This guarantees you’ve expelled all the air that could prevent proper suction.
If water doesn’t seem to stay in the pump when you’re trying to fill it, check for leaks in the system. Remember, you’re creating a vacuum effect, so the pump casing must be completely filled for successful priming.
Seal Prime Plug
After filling the pump casing completely with water, you’ll need to secure the prime plug properly—this step cannot be overlooked! Locate the prime plug at the top of your pump, typically identifiable by its square or hexagonal shape. With clean hands, firmly replace the plug into its opening.
Turn the prime plug clockwise until it’s tightly sealed. You’ll want to guarantee there aren’t any gaps where air could sneak in and disrupt the vacuum needed for proper pump function. A loose seal is often the culprit behind failed priming attempts, so don’t be shy about giving it a good, firm twist.
Once you’ve verified the prime plug is securely sealed, you’re ready to reconnect the power and start the pump. This tight seal maintains the pressure necessary for your well pump to operate effectively.
Test Water Flow
Now that your prime plug is secured, it’s time to verify your work by testing the water flow. Switch the power back on to your well pump and listen for it to engage. If everything is working correctly, you’ll hear the pump motor running smoothly.
Next, go to the nearest tap and turn it on. Initially, you might notice some spluttering as air works its way out of the system. Don’t worry – this is normal. Within a minute or two, the water should flow steadily without air bubbles or strange noises.
If your water flow seems weak or inconsistent, you may need to repeat the priming process. Strong, consistent water pressure indicates successful priming. Once you’ve confirmed proper water flow, your pump is ready to resume its regular operation.
What are Self-Priming Borehole Pumps?
Well and Borehole Pumps
Many homeowners find self-priming well pumps to be a convenient solution for their water supply needs. These specialised non-submersible well pumps have a distinct advantage: they can evacuate air from the suction line and create the necessary vacuum without manual intervention.
Unlike standard non-submersible well pumps that require manual priming when first installed or after malfunctions, self-priming models contain a water reservoir that maintains enough water for the pump to function. When you turn on a self-priming pump, it automatically creates the pressure vacuum needed to pull water from your well.
This automation saves you time and effort, especially after power cuts or system maintenance. While they’re typically more expensive upfront, many homeowners find the convenience worth the investment. You’ll still need to monitor performance, but you won’t have to deal with the priming process.
These pumps utilise the principle of centrifugal force to create a partial vacuum that efficiently draws liquid from depths up to 10 metres.
Why is Priming a Borehole Pump Vital?
While self-priming pumps offer convenience, understanding why priming matters for any well pump system will help you appreciate its importance. Priming your water pump creates the necessary vacuum pressure that enables it to pull water from your well and distribute it through your home’s water lines. Think of priming as your pump’s pre-flight check—it guarantees everything’s ready for takeoff.
When you prime accurately, you’re setting up your system for reliable performance and safeguarding your investment. Without proper priming, your pump might run dry, drastically reducing its lifespan and efficiency. You’ll also notice the difference in water pressure throughout your property when your pump is properly primed.
Though you’ll typically only need to prime during installation or after repairs, this essential process keeps your water flowing smoothly when you need it most. For deeper wells, borehole pumps are designed specifically for high-pressure applications where proper priming is crucial to performance.
Reasons a Pump Requires Repriming
Even though your water pump might be running perfectly today, several situations can arise that necessitate re-priming. The most common issue occurs when air in the system creates an airlock, preventing water from flowing properly. You’ll notice this when your taps splutter or water pressure drops considerably.
Seasonal changes can also affect your pump’s performance. If you’ve winterised your system or haven’t used it for months, it’ll likely need to be re-primed before regular use. Additionally, mechanical problems like worn seals or washers can allow air to enter, disrupting the vacuum needed for proper operation.
After performing any maintenance or repairs on your pump or plumbing system, re-priming is essential to restore proper function and prevent damage to your equipment. Similar to puddle pumps, regular maintenance requirements for water pumps include checking impellers and seals to prevent issues that could necessitate re-priming.
Conclusion
You’ve now mastered the basics of priming your well pump, a skill that’ll save you time and money. Remember, proper priming prevents damage and ensures reliable water flow to your home. Don’t skip regular maintenance checks on impellers and seals. If you’re weary of repeatedly priming, consider upgrading to a self-priming model. With these techniques in your homeowner toolkit, you’ll handle water system issues with confidence.